


Dernières vidéos

Using a traditional shipwright's slick to rough bevel the keelson and shape the stem on my Poulsbo Boat Project. Fast, efficient, and surprisingly satisfying. Full video on Nomad Boat Building. Join me on Patreon https://www.patreon.com/nomadboatbuilding My Website: https://nomadboatbuilding.com/ #BoatBuilding #Woodworking #WoodenBoat #NomadBoatBuilding #Shipwright #PoulsboBoat
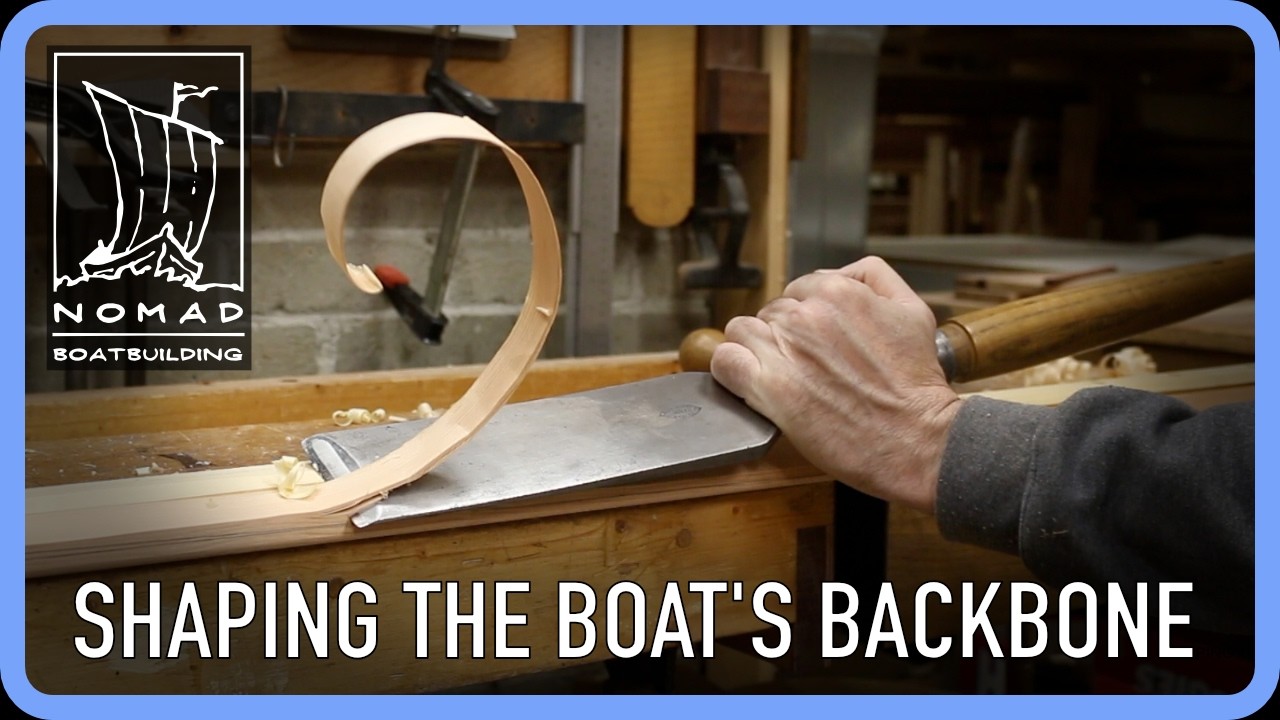
Howdy folks! Welcome back to Nomad Boat Building. My name is Mark Reuten. We're back working on the Poulsbo Boat Project. Before final assembly of the backbone, I tackle a few important jobs: assembling the transom and transom knee, rough beveling the keelson, and laying out and shaping the stem bevels. The Poulsbo Boat was a popular sport fishing boat built in Poulsbo, Washington during the 1950s and 60s by Roland Young using traditional carvel construction. My version uses cedar strip construction with fiberglass inside and out. If you enjoy wooden boats, woodworking, traditional craftsmanship, and practical boat shop problem solving, you're in the right place. Support the channel: Join me on Patreon https://www.patreon.com/nomadboatbuilding Website https://nomadboatbuilding.com/ Poulsbo Boat Project Playlist https://youtube.com/playlist?list=PLnOoJJKdbR4JZFfEMWhXjloa0LhCp0GPI&si=wVjR0gySMlqsx2jw CHAPTERS 00:00 Introduction 00:49 Marking the keelson bevel 01:45 Preparing for assembly 02:25 Sanding the transom knee 03:17 Glue-up preparation and taping tricks 04:49 Waxing fasteners 05:40 Two-step epoxy bonding process 06:47 Rough beveling the keelson 07:12 Using a shipwright's slick safely 09:25 Cleaning up with a smoothing plane 10:59 Mounting the backbone to the molds 12:32 Laying out stem bevels from the lofting 20:58 Final stem shaping with a spokeshave 21:29 Carving the maker's mark 23:39 Final backbone assembly 25:55 Gluing the stem into place 27:51 Fastener and alignment tips 29:19 Final fit check

Drilling a perfectly straight hole through a curved boat stem takes more than luck. In this clip from the Gannet project, I install a hefty bronze painter ring using a homemade spear-point pilot bit, auger bits, and a counterbore for clean results. Follow along as we work through traditional wooden boatbuilding techniques with practical shop-made solutions. Website: http://www.nomadboatbuilding.com Patreon: https://www.patreon.com/nomadboatbuilding Instagram: @nomadboatbuilding

Need to drill a long hole straight through thick wood and land exactly where you want on both sides? In this episode of Nomad Boatbuilding, I show the method I use to drill accurate bolt holes through centerline boat parts like stems, transoms, and skegs—without relying on a jig or drill press. Follow along as I install a bronze painter ring in the stem of a wooden boat and cover pilot drilling, homemade spear-point bits, sighting techniques, auger bits, counterboring for nuts and washers, and simple tricks to recover when things don’t go perfectly. You’ll also learn how to counterbore without specialty tooling and my simple dowel trick for guiding Forstner or spade bits. Need a counterbore? I get mine from these suppliers: McMaster-Carr: https://www.mcmaster.com/products/counterbores/drill-bit-counterbores-for-wood~~/ Top-Notch fasteners: https://tnfasteners.com/product/counterbores-x-type/ 🌐 Website: https://nomadboatbuilding.com/ ❤️ Patreon: https://www.patreon.com/nomadboatbuilding #boatbuilding #woodworking #drillingtips #woodenboat #boatbuilder #woodworkingtips #diyboat #howto #woodworkingprojects #marineconstruction Chapters 00:00 Why drilling long straight holes is difficult 00:19 Installing a painter ring in the boat stem 00:56 What a painter ring does and why it matters 01:19 The challenge: drilling long holes straight 01:26 My secret weapon: shop-made spear-point pilot bit 02:23 Avoiding hidden fasteners & choosing the right location 02:56 Aligning centerlines for accurate drilling 03:22 Why square-to-surface matters more than perfectly plumb 03:58 Body positioning for better drill control 04:38 Starting the pilot hole & correcting angle early 05:21 What to do if you hit a fastener 05:39 Fixing holes that land slightly off-center 06:44 Evaluating accuracy & why 1/16" is acceptable 07:11 Drilling the final hole with an auger bit 08:05 Using a twist drill to clean up alignment 08:36 Counterboring for nuts & washers explained 09:28 Measuring counterbore depth with a feeler gauge 10:48 Cleaning up the counterbore with a Forstner bit 11:34 No counterbore bit? Alternative methods that work 12:06 Dowel trick for guiding Forstner or spade bits 12:34 Locking the nut & final fitment tips 13:02 Why removable wooden plugs beat epoxy 13:40 Final install considerations for the painter ring 14:07 Wrap-up & next video

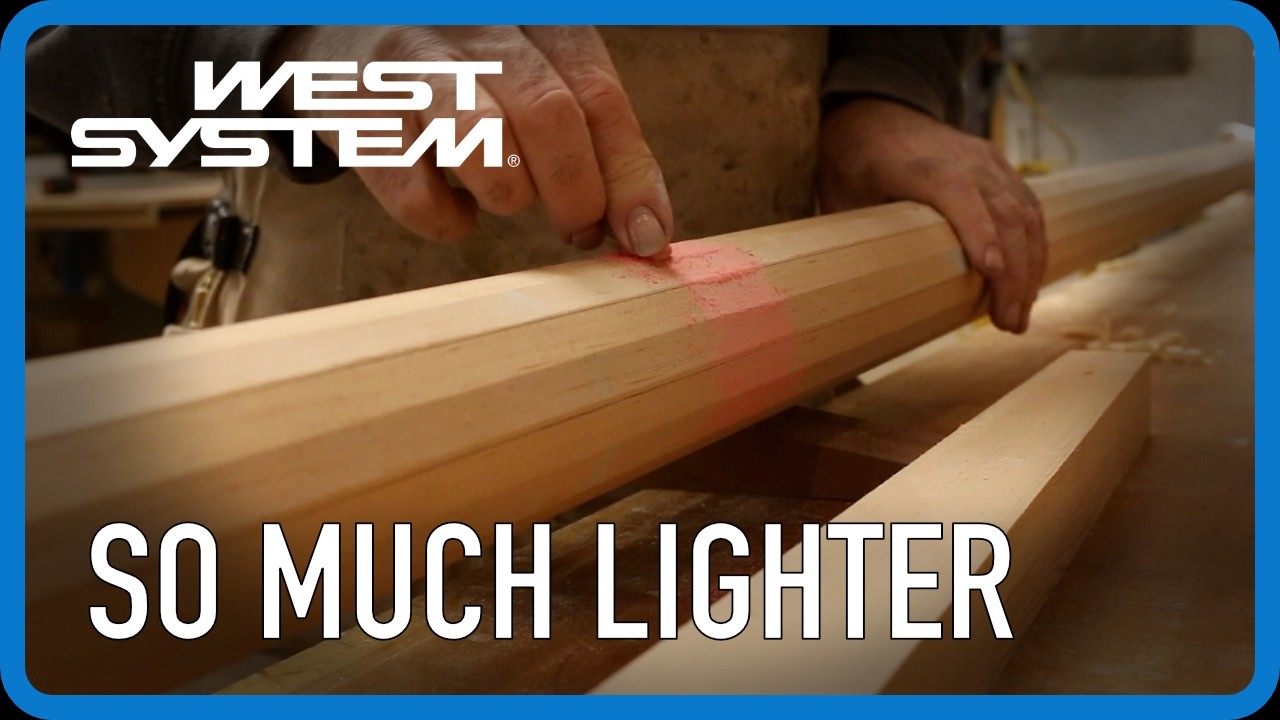
Chapters 00:00 Why scarf joints matter in boatbuilding 00:08 Project intro – Poulsbo Boat build 00:33 Milling stock for long laminations 01:23 Surface prep and epoxy bonding basics 02:15 Hook scarf vs flat scarf explained 02:47 Scarf jig setup on the table saw 03:38 Glue-up setup on the bench 05:30 Preventing movement during glue-up 06:28 Using wax paper and clamping strategy 07:05 Why epoxy is ideal for scarf joints 08:11 Two-part bonding process explained 10:24 Thickening epoxy with colloidal silica 11:36 Aligning and fastening scarf joints 14:08 Clamping strategy and pressure tips 15:05 Using a strongback as a glue-up bench 16:25 Mixing fresh epoxy and timing 17:56 Clamping pads and shop-made solutions 18:48 Alternative alignment methods 19:05 Why epoxy allows shorter scarf joints 19:44 Final thoughts and wrap-up Hashtags #BoatBuilding #PoulsboBoat #WoodenBoat #ScarfJoint #Woodworking #Epoxy #WestSystem #NomadBoatBuilding Suggested Tags poulsbo boat, scarf joint woodworking, scarf joint boat building, epoxy woodworking, west system epoxy, wooden boat building, boat building techniques, scarf joint jig, woodworking tips, laminating wood, strip built boat, nomad boat building

Turning short boards into long ones 🔧 Scarf joints are one of the most essential techniques in wooden boat building, and this is how I batch them efficiently using West System Epoxy. My Website: https://www.nomadboatbuilding.com Epoxy used in this video: https://www.westsystem.com

In this episode of the Poulsbo Boat Project, I continue building the backbone of this classic 15’ sport fishing boat design. This week is all about dry fitting the centerline structure: stem, keelson, transom, transom knee, and cutwater. After refining the transom in the last episode and setting up the station molds on the strongback, it’s time to start bringing the backbone together. I trim and fit the transom knee, steam-bend the aft section of the keelson into place, and continue shaping and fitting the cutwater assembly before final planking begins. This project is a modern cedar strip reinterpretation of a classic 1950s Ronald Young - designed Poulsbo Boat, originally built as a traditional carvel-planked sport fishing boat in Poulsbo, Washington. Website: https://www.nomadboatbuilding.com Patreon: https://www.patreon.com/nomadboatbuilding Instagram: https://www.instagram.com/nomadboatbuilding/ Support the channel: 👍 Like this video 💬 Leave a comment 🔔 Subscribe and turn on notifications Chapters 00:00 Introduction & project recap 00:23 What is the boat backbone? 01:00 Fitting the transom knee 02:04 Cutting the keelson notch in the transom 03:34 Marking cuts with tape for visibility 04:26 Final fitting the knee 05:39 Steam bending the keelson 07:39 Building and fitting the cutwater 09:45 Laying out the upper cutwater section 11:10 Cutting and shaping the hook scarf 17:23 Fine tuning the fit 18:51 Thinking ahead in boatbuilding 20:21 Kerfing and sweetening joints 20:47 Week 5 progress update 22:35 What’s next in the build #boatbuilding #woodworking #woodenboat #stripbuilt #cedarstrip #epoxy #steambending #poulsboboat #nomadboatbuilding

Howdy folks! Welcome back to Nomad Boat Building. My name is Mark Reuten, and this video is part of the Poulsbo Boat Project, where I’m documenting the complete build of a modern Poulsbo Boat from start to finish. Back in the shop after a long delay, I finally get back to work on the Poulsbo Boat Project. In this episode I set up the station molds on the strongback, align the building jig, and start fitting the backbone components. I also run into a frustrating issue: the transom shape isn’t agreeing with the mold the way it should. Rather than ignore the problem, I walk through how I diagnose fit issues, rethink the geometry, and make practical adjustments so the finished hull will look right. Along the way, I reshape the hawse holes, refine the transom, and talk a bit about the reality of wooden boat building: technical problem solving mixed with a whole lot of hard graft. The Poulsbo Boat is being built using traditional wooden boat building techniques combined with practical modern methods where appropriate. Throughout this series you'll see the full process including lofting, milling lumber, laminating structural parts, strip planking, fiberglassing, interior joinery, and final fit-out. If you're interested in woodworking, traditional craftsmanship, wooden boats, and real boat shop problem solving, this series follows the entire build step-by-step. Support the channel on Patreon https://www.patreon.com/nomadboatbuilding Your support helps keep these boatbuilding videos coming. Follow along on Instagram @nomadboatbuilding Website https://www.nomadboatbuilding.com Watch the full Poulsbo Boat series here: https://youtube.com/playlist?list=PLnOoJJKdbR4JZFfEMWhXjloa0LhCp0GPI&si=wVjR0gySMlqsx2jw New episodes follow the entire build process from first lumber to launching the finished boat. Your support helps keep these boatbuilding videos coming.

I got embarrassing shrinkage - Building the Poulsbo Boat #WoodenBoat#PoulsboBoat #WoodenBoatBuilding
Howdy folks! Welcome back to Nomad Boat Building. My name is Mark Reuten, and this video is part of the Poulsbo Boat Project, where I’m documenting the complete build of a modern Poulsbo Boat from start to finish. The Poulsbo Boat is being built using traditional wooden boatbuilding techniques combined with practical modern methods where appropriate. Throughout this series you'll see the full process including lofting, milling lumber, laminating structural parts, strip planking, fiberglassing, interior joinery, and final fit-out. If you're interested in woodworking, traditional craftsmanship, wooden boats, and real boat shop problem solving, this series follows the entire build step-by-step. Watch the full series here: https://youtube.com/playlist?list=PLnOoJJKdbR4JZFfEMWhXjloa0LhCp0GPI&si=wVjR0gySMlqsx2jw My website: https://www.nomadboatbuilding.com Instagram: https://www.instagram.com/nomadboatbuilding/ It's not about the money but living isn't free... Here are some ways you can support this channel. Buy some merch: https://www.nomadboatbuilding.com/shop/ Support these videos with monthly or annual pledges at Patreon: https://www.patreon.com/nomadboatbuilding Or make a one time donation: https://www.paypal.com/paypalme/nomadboatbuilding

Fiberglassing doesn’t have to be messy, itchy, or intimidating. In this video, I walk through my practical, low-stress approach to fiberglassing wooden boat parts — the same methods I use in my own shop to keep the process clean, efficient, and predictable. If you’ve avoided fiberglassing because it feels complicated or unpleasant, this video is for you. Over the years I’ve developed simple techniques that remove most of the frustration and help produce consistent results without unnecessary fuss. Today we fiberglass flat plywood deck panels for an Iain Oughtred–designed Gannet using WEST SYSTEM epoxy products. Along the way, I cover preparation, cloth handling, epoxy application, and several small tricks that make a big difference in the final finish. In this video you’ll learn: • Why fiberglass improves plywood durability and stability • How to prepare panels before glassing • Setting up a clean workspace for epoxy work • Cutting and positioning fiberglass cloth properly • Joining cloth seams cleanly using salvage edges • Mixing epoxy efficiently with simple shop tools • Proper wet-out technique using a spreader • How to avoid bubbles and excess resin • Timing multiple coats for a chemical bond • Using peel ply (release fabric) to reduce sanding • Bias-cut fiberglass for tight curves and stems Fiberglassing isn’t about rushing — it’s about preparation and patience. Done well, it saves time later and dramatically improves durability. 🌐 Website: https://www.nomadboatbuilding.com 📸 Instagram: https://www.instagram.com/nomadboatbuilding 🛠 Support these videos on Patreon: https://www.patreon.com/nomadboatbuilding If you enjoy practical wooden boatbuilding knowledge and want to help keep these videos coming, please consider supporting the channel on Patreon. This video is sponsored by WEST SYSTEM Epoxy: https://www.westsystem.com ⏱ Chapters: 00:00 Why Fiberglassing Feels Intimidating 00:36 Project Overview — Gannet Deck Panels 01:19 Why Fiberglass Plywood Decks 01:49 Shop Preparation & Clean Workspace 02:49 Mixing Epoxy Using a Drill Press 03:43 Cutting Fiberglass Cloth 04:17 Positioning & Smoothing Cloth 06:02 Is Fiberglass Actually Itchy? 07:38 Understanding Salvage Edges 08:43 Joining Two Pieces of Cloth Cleanly 10:05 Cleaning Up Cut Edges 12:13 Managing Overlaps & Layout 14:02 Planning Your Glassing Day 15:16 Preventing Air Bubbles (Temperature Trick) 15:23 WEST SYSTEM Epoxy Setup 17:01 Safety & Respirator Use 17:21 Wetting Out the Cloth 21:03 Removing Excess Epoxy Properly 22:50 Timing Additional Coats 24:31 Using Peel Ply / Release Fabric 25:51 Results After Cure 27:53 Sanding Reality Check 28:49 Bias-Cut Fiberglass for Tight Curves 31:06 Practice Makes Better Results 31:18 Thanks & Closing Thoughts #fiberglassing #boatbuilding #woodenboat #epoxy #westsystem #DIYboatbuilding #woodworking #traditionalcraft #NomadBoatBuilding #MarkReuten
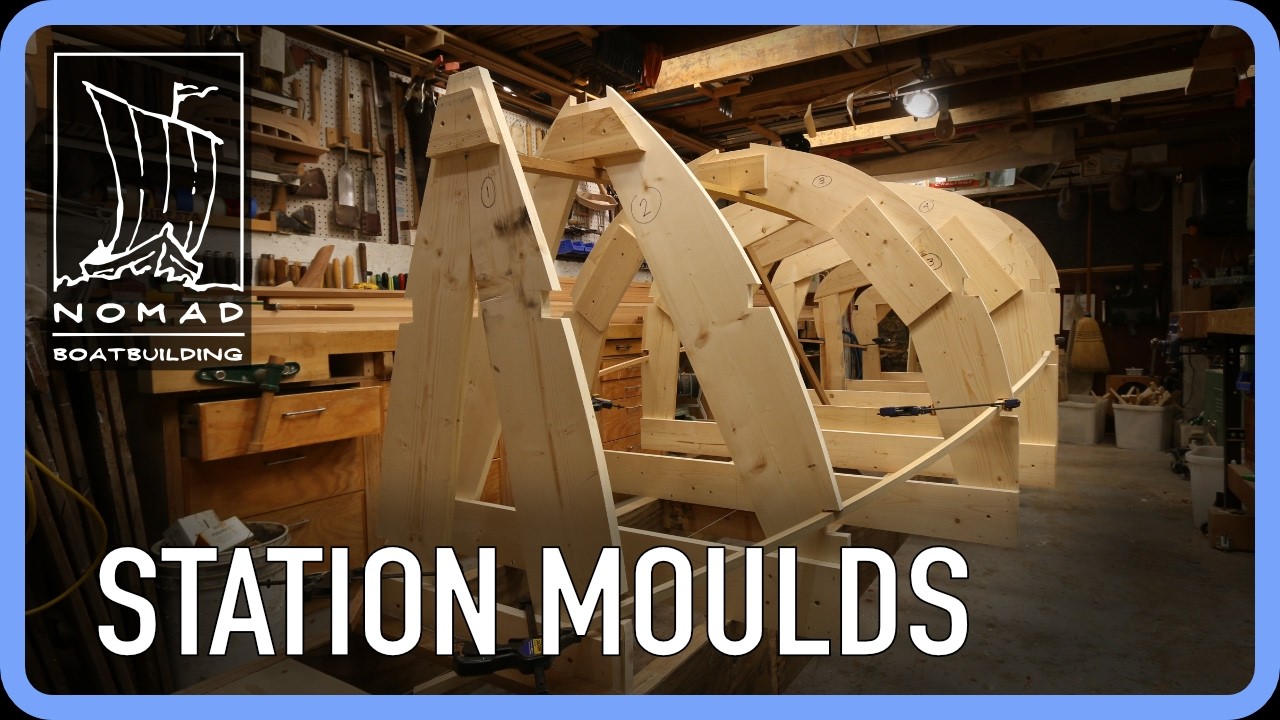
Howdy folks! Welcome back to Nomad Boat Building. My name is Mark Reuten, and this video is part of the Poulsbo Boat Project, where I’m documenting the complete build of a traditional Poulsbo Boat from start to finish. In this episode, we build the station molds—the forms that define the shape of the hull. These molds are critical to the entire build, as every plank we install will reference them. Instead of using plywood, I walk through my preferred method of building molds from solid 1x material. This approach is more economical, easier to work with in the shop, and allows the material to be reused after the molds are no longer needed. We go step-by-step through laying out the mold shape from the plans, transferring the geometry using simple tools, cutting the curves on the bandsaw, and assembling the molds with gussets and cross spalls. Along the way, I also cover notch layout for inwales and risers, fairing considerations, and a few lessons learned (including what not to do). The Poulsbo Boat is being built using strip planking with cedar strips, reinforced with fiberglass inside and out—a blend of traditional and modern boatbuilding techniques. If you're interested in woodworking, traditional craftsmanship, and practical boat shop problem solving, this series follows the entire build from start to finish. My Website https://www.nomadboatbuilding.com Support the channel on Patreon https://www.patreon.com/nomadboatbuilding Follow along on Instagram @nomadboatbuilding Poulsbo Boat Build Series Watch the full series here: https://www.youtube.com/playlist?list=PLnOoJJKdbR4JZFfEMWhXjloa0LhCp0GPI Chapters 00:00 Introduction 00:28 What is a Poulsbo Boat 00:44 Strip planking vs traditional planking 01:00 What station molds are 01:26 Why use 1x material instead of plywood 02:19 Material layout for molds 03:27 Finding the miter joint 04:18 Cutting and assembling the mold halves 05:20 Transferring the mold shape 06:18 Marking baseline and reference details 07:15 Notch templates and consistent angles 08:16 Removing the mylar and preparing for layout 09:19 Fairing the mold with a batten 10:20 Assembling and reinforcing the mold 11:28 Cutting the molds on the bandsaw 13:43 Why 1x material is easier than plywood 14:37 Notches for keelson and structure 15:01 Mistake: cutting notches too early 16:41 Fixing fairing issues with blocking 17:06 Adjusting process due to bench size 18:37 Aligning and gusseting molds 21:04 Refining the mold shape 23:19 Solving layout table limitations 24:21 Final assembly on the strongback reference 25:11 Installing the cross spall 26:14 Finished molds and next steps #BoatBuilding #PoulsboBoat #WoodenBoat #StripPlanking #BoatBuildingTips #Woodworking #TraditionalCraft #NomadBoatBuilding
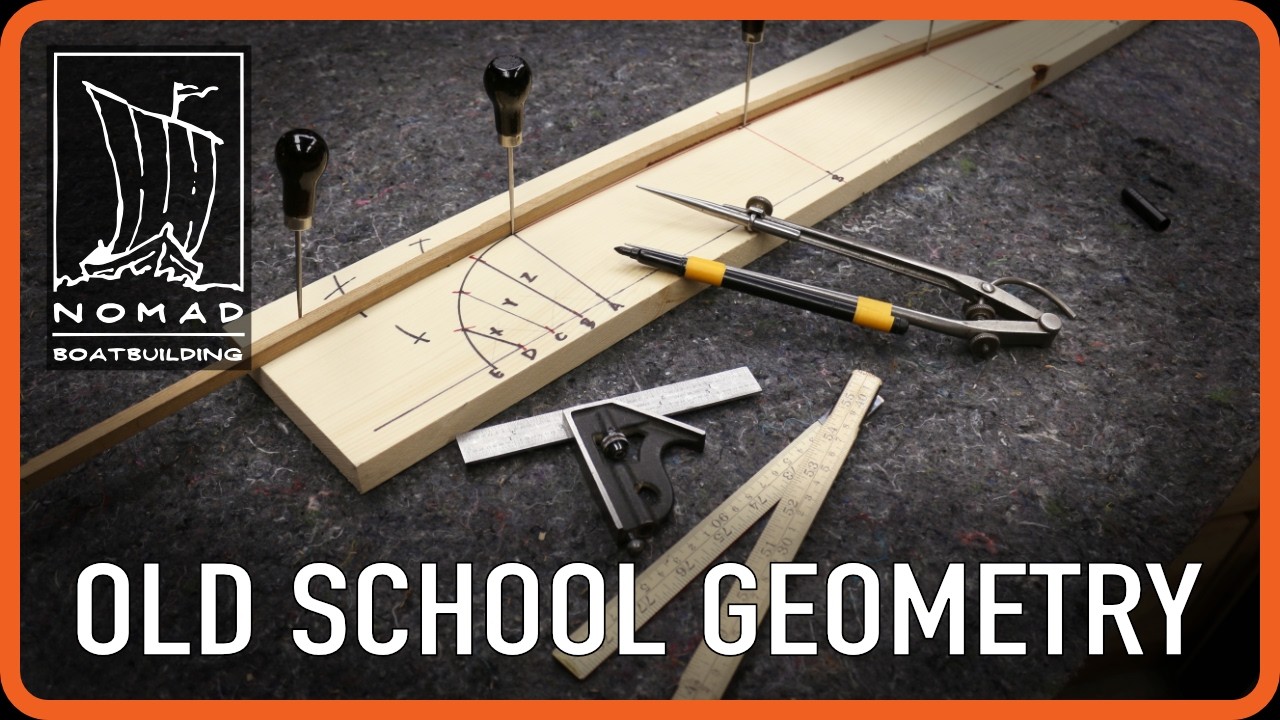
Howdy folks! Welcome back to Nomad Boat Building. My name is Mark Reuten, and in this episode, we step back into traditional boatbuilding geometry and lay out a deck camber using simple geometric methods. Instead of relying on some form of compass to lay out a chord of a circle I walk through a practical shop-friendly approach using basic tools to create an accurate crown over a given span. We talk about how deck camber is defined in boat plans, how to translate that into a physical layout, and why this geometric method is often faster and more practical than using a string-and-radius approach—especially in a small shop. This technique is useful not just for deck beams, but also for making reusable patterns, shaping beam shelves, and ensuring consistent curvature across the entire boat. My Website https://www.nomadboatbuilding.com Support the channel on Patreon https://www.patreon.com/nomadboatbuilding Follow along on Instagram @nomadboatbuilding Support the Channel If you enjoy these videos you can help the channel by: • Liking the video • Subscribing to the channel • Leaving a comment • Using Super Thanks Support these videos with monthly or annual pledges at Patreon: https://www.patreon.com/nomadboatbuilding Chapters 00:00 Introduction to deck camber geometry 00:11 What deck camber actually is 00:29 Reference: Chapelle’s Boat Building 01:12 Why traditional knowledge still matters 02:20 Why this method makes more sense over time 03:08 Defining camber (crown vs width) 03:49 Example: 3" crown over 5 ft 04:56 Laying out the baseline 05:44 Establishing perpendicular height 06:15 Creating the camber radius 06:30 Dividing the arc using geometry 07:30 Dividing the baseline 08:17 Connecting points to form the curve 09:56 Using awls to set reference points 10:53 Fairing the curve with a batten 11:48 Why not just use a string radius? 12:30 Making reusable camber patterns 13:09 Applying camber across the boat 13:41 Real-world compromises and fairness 14:05 Final thoughts on geometry in the shop #WoodenBoat #BoatBuildingGeometry #DeckCamber #Woodworking #TraditionalCraft #NomadBoatBuilding

My website: https://www.nomadboatbuilding.com Instagram: https://www.instagram.com/nomadboatbuilding/ It's not about the money but living isn't free... Here are some ways you can support this channel. Buy some merch: https://www.nomadboatbuilding.com/shop/ Support these videos with monthly or annual pledges at Patreon: https://www.patreon.com/nomadboatbuilding Or make a one time donation: https://www.paypal.com/paypalme/nomadboatbuilding
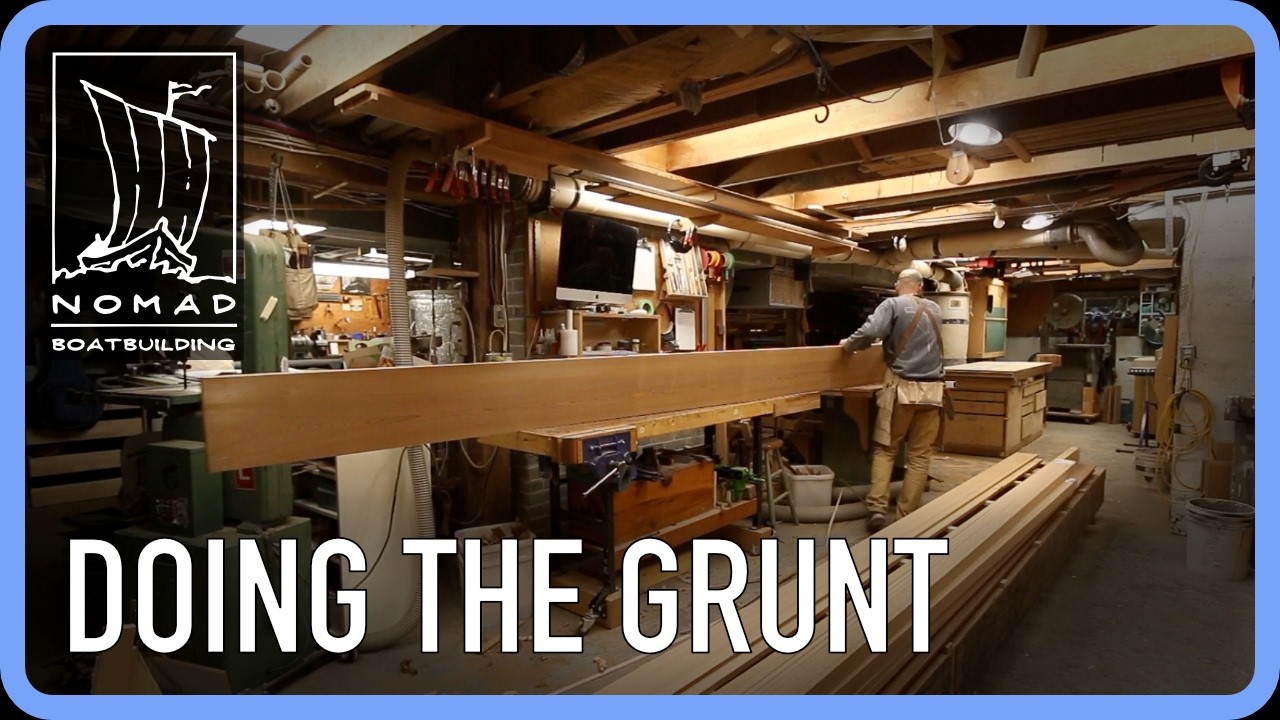
Howdy folks! Welcome back to Nomad Boat Building. In Episode 2 of the Poulsbo Boat Project, I spend the week preparing materials and fabricating a few laminated bits. This stage of boatbuilding may not be the most glamorous, but it’s one of the most important. A huge portion of the time is spent sorting lumber, milling stock to thickness, and preparing parts before assembly can even begin. In this episode you’ll see: • Processing lumber and selecting materials for the build • Milling boards to thickness and preparing stock • Ripping western red cedar strips for strip-built planking • Laminating the stem and transom knee • Fixing springback in a laminated stem • Laminating a cutwater (outer stem) • Tips for clamps, laminations, and shop workflow The Poulsbo Boat will be strip-built with western red cedar planking, which allows for a lightweight and stable hull once fiberglassed. I also explain why I’m skipping the traditional bead-and-cove process for these planks and how I plan to align them during installation. Boatbuilding is often about problem solving, and when the laminated stem sprung back more than expected, I show how to correct it and bring it back to the proper lines. If you enjoy woodworking, traditional craftsmanship, wooden boats, or boatbuilding techniques, this series follows the entire build from lofting to launch. 👍 If you enjoy the videos, please like, subscribe, and consider supporting the channel. You can also support the channel here: Patreon → see link in description Thanks for watching! 00:00 Introduction – PSBow Boat Project Week 2 00:08 Processing materials for the build 00:33 Laminated stem blank 00:49 Choosing sapele instead of oak 01:24 Structural lumber selection 01:32 Transom knee lamination 01:39 Thickness planing stock 02:13 Why milling lumber takes so long 02:52 Preparing cedar planking strips 03:18 Why vertical grain is ideal for strip planking 04:26 Why I skipped bead and cove strips 05:34 Fixing springback in the laminated stem 06:43 What caused the springback 08:25 Laminating the transom knee 09:23 Adjusting lamination technique 10:04 Channel support options 12:29 Marking the stem lines 13:02 Fairing the stem back to shape 15:27 Bandsaw safety tip 16:06 Laminating the cutwater (outer stem) 17:41 Lamination setup explained 18:39 Clamping techniques for tight bends 19:50 Clamp buying advice 20:39 Leaving the lamination to cure 20:43 Centerline fastener planning 21:33 Wrap up

How do you build a lightweight wooden mast? In this episode, we make a bird’s mouth hollow spar, laying out an elliptical taper, cutting precise joinery, and gluing the mast together with epoxy. #Boatbuilding #Woodworking #WoodenBoat #SparMaking My website: https://www.nomadboatbuilding.com Instagram: https://www.instagram.com/nomadboatbuilding/ It's not about the money but living isn't free... Here are some ways you can support this channel. Buy some merch: https://www.nomadboatbuilding.com/shop/ Support these videos with monthly or annual pledges at Patreon: https://www.patreon.com/nomadboatbuilding Or make a one time donation: https://www.paypal.com/paypalme/nomadboatbuilding
In this episode of Nomad Boat Building, Mark walks through the full process of building a bird’s mouth hollow wooden mast using traditional spar-making techniques and modern epoxy methods. Starting from the sail plan, we break down how to determine mast diameters, lay out an elliptical spar taper, and calculate stave dimensions. Then it’s into the shop to mill Douglas fir staves, cut precise bird’s mouth joints, plane accurate tapers, and glue everything together using West System 105 epoxy and 207 hardener. This hollow spar construction method creates a lightweight, strong wooden mast that’s easier to handle and step than a solid spar. Whether you’re building a small boat mast, boom, or yard, these techniques apply to traditional wooden spars of all kinds. Big thanks to West System Epoxy for supporting this video. https://www.westsystem.com/ 👉 Bird’s Mouth Spar Calculator & Resources https://www.chase-small-craft.com/birdsmouth-sparmaking  #Boatbuilding #WoodenMast #SparMaking #BirdsmouthJoint #Woodworking #Epoxy #TraditionalCraft #WestSystem00:00 Intro & Finished Mast Tease 00:41 What Is a Bird’s Mouth Mast? 00:47 Reading the Sail Plan for Mast Dimensions 01:32 Understanding Elliptical Spar Tapers 02:42 Simple Method for Laying Out a Mast Taper 05:44 Calculating and Tapering the Staves 06:28 Keeping One Side of the Mast Flat 07:30 Milling Douglas Fir Staves 08:52 Cutting the Bird’s Mouth Joint 09:25 Planing Stave Tapers by Hand 10:41 Preparing for Glue-Up & End Blocking 11:07 Making Octagonal Blocking for Mast Ends 13:26 Setting Up for the Epoxy Glue-Up 14:47 Keeping the Mast Flat During Assembly 17:14 Wetting Out Joints with Epoxy 19:13 Avoiding Glue Starvation 20:01 Installing Internal Mast Blocking 21:24 Coating the Inside of the Hollow Mast 22:37 Thickened Epoxy in the Bird’s Mouth Joints 24:17 Assembling the Staves in Saddles 26:22 Closing the Final Stave 27:31 Clamping with Hose Clamps 29:48 Laying the Mast Flat to Set Shape 30:45 Using a Laser to Keep the Mast Straight 31:44 Glue-Up Complete 34:18 Knocking Off Corners – Octagon Shaping 35:10 The 7-10-7 Rule (Octagon to 16 Sides) 38:53 Sanding the Mast Round 39:38 Why Hollow Masts Are Worth It 39:56 Final Thoughts & Resources My website: https://www.nomadboatbuilding.com Instagram: https://www.instagram.com/nomadboatbuilding/ Support these videos with monthly or annual pledges at Patreon: https://www.patreon.com/nomadboatbuilding Or make a one time donation: https://www.paypal.com/paypalme/nomadboatbuilding

Most wooden boat spars aren’t straight tapers — they’re elliptical. And laying one out is way easier than you think. Here’s the simple method traditional boatbuilders use to shape masts, booms, and yards without complicated math. 🌐 nomadboatbuilding.com🛠 Support the builds: patreon.com/nomadboatbuilding #boatbuilding #woodenboat #sailboat #boatbuilder #woodworking #traditionalcraft #diyboat #maritime #sailinglife

Building a wooden sailboat mast, boom, or yard? Here’s how to lay out a proper elliptical spar taper — the traditional shape used on real wooden boats. In this video, Mark from Nomad Boat Building walks you step-by-step through the simple layout method used to create an elliptical taper on wooden spars. Whether your boat plans give you full dimensions or just major and minor diameters, this technique lets you accurately draw and cut a fair, traditional taper using basic tools and a scrap of wood. This is an essential skill for wooden boat builders working on masts, booms, and yards — and it’s much easier than it sounds. 🌐 Website: https://www.nomadboatbuilding.com 📸 Instagram: https://www.instagram.com/nomadboatbuilding 🛠 Support these builds on Patreon: https://www.patreon.com/nomadboatbuilding If these videos help you with your own boat project, consider supporting the channel on Patreon — it helps keep these traditional boatbuilding skills alive and more tutorials coming. ⏱ Chapters: 00:00 Who This Video Is For 00:12 What Is a Spar Taper? 00:27 Why Spars Have Elliptical Tapers 00:33 What Boat Plans May (or May Not) Include 01:23 When You Have to Figure It Out Yourself 01:49 Tools Needed for Layout 02:09 Establishing Reference Lines 02:42 Major vs Minor Diameter 03:02 The Concept of Stretching a Circle 03:21 Dividing the Circle into Equal Parts 04:20 Transferring Measurements to the Spar 05:26 Connecting the Dots for the Elliptical Curve 06:16 Using a Batten to Fair the Line 06:35 Important: One Face of a Spar Is Often Straight 07:27 Real Example from Boat Plans 07:52 Rounding the Spar (Teaser for 7-10-7 Rule) #boatbuilding #woodenboat #sailboatbuilding #traditionalboatbuilding #woodworking #marinemaking #diyboat #boatbuilder #sparmaking #mastbuilding
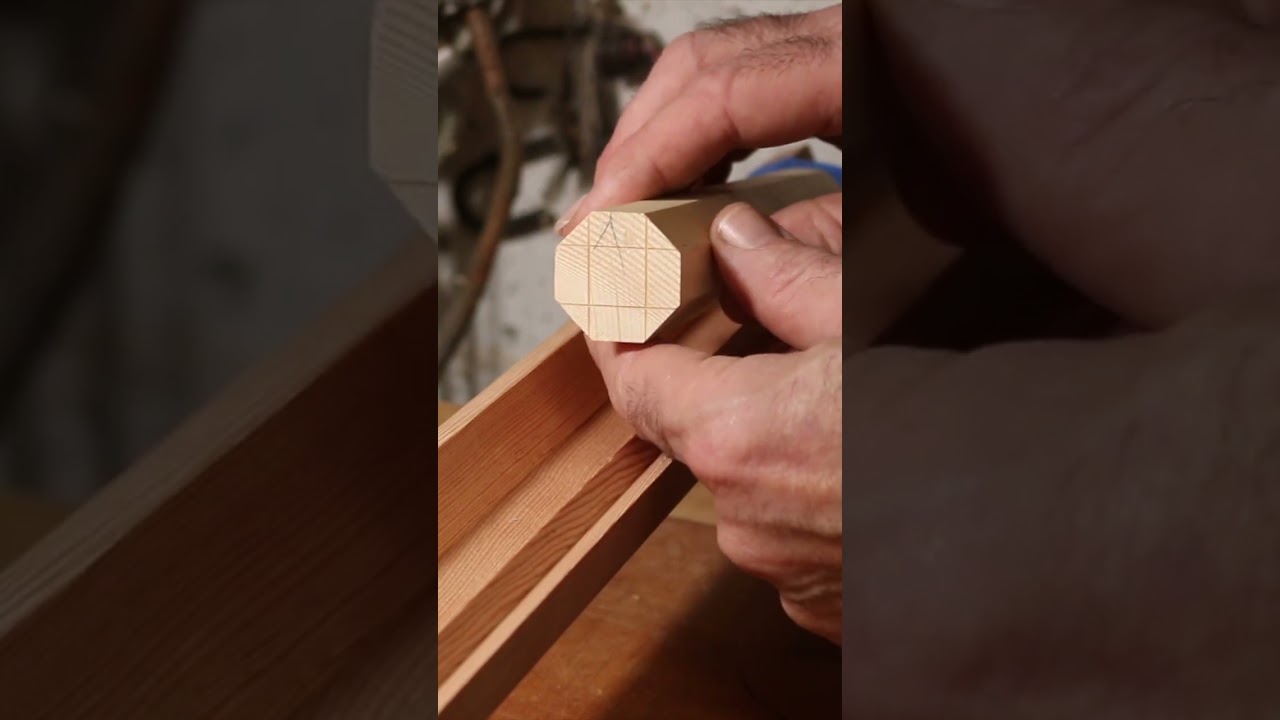
Most people think wooden boatbuilding requires complicated math. It doesn’t. The 7-10-7 rule is a simple geometric trick that lets you turn square stock into a perfectly rounded spar — quickly, accurately, and without repetitive calculations. Square → Octagon → 16 sides → Round. Simple. Elegant. Reliable. 🌐 nomadboatbuilding.com 🛠 Support the channel: patreon.com/nomadboatbuilding #boatbuilding #woodworking #sparbuilding #handtools #traditionalcraft #geometry #DIY

The 7-10-7 Rule — An Old Boatbuilder’s Trick for Perfectly Rounding a Spar In this episode of Nomad Boatbuilding, I share a simple geometric method that replaces repetitive math when shaping spars by hand. Some people think wooden boat building requires complicated calculations. That can be true when designing boats — but building them is another story. In practice, geometry is often far more useful than math. The 7-10-7 rule is a straightforward way to divide the face of a square into proportional sections (7 units, 10 units, 7 units — 24 in total). By removing the corners at those marks, we quickly create an accurate octagon. Repeat the process and we move from square to octagon to 16 sides… and eventually to a smooth, round spar. In this video I cover: • How the 7-10-7 rule works • Why imperial rulers make scaling easy • Turning square stock into an octagon • Moving from 8 sides to 16 sides • Using (and making) a spar gauge • Applying the method to tapered spars • Why geometry beats repetitive calculation • Using the same principle for moldings, banjo necks, plugs, and even walking sticks This method works for squares, rectangles, trapezoids, and tapered spars. It’s one of those core pieces of traditional boatbuilding knowledge that makes shaping round forms efficient, accurate, and satisfying. 🌐 Website: https://www.nomadboatbuilding.com 📸 Instagram: https://www.instagram.com/nomadboatbuilding 🛠 Support these videos on Patreon: https://www.patreon.com/nomadboatbuilding If you value traditional boatbuilding knowledge and want to help keep these videos coming, consider supporting the channel on Patreon. ⏱ Chapters: 00:00 Introduction — What Is the 7-10-7 Rule? 00:43 Geometry vs Math in Boatbuilding 01:01 Turning Square Stock into an Octagon 01:24 How the 7-10-7 Division Works 03:56 Demonstration on a 6x6 Cross Section 06:24 From Octagon to 16 Sides 08:08 Applying the Rule to Rectangles & Trapezoids 11:17 Using the Rule on a Tapered Spar 12:37 Spar Gauges Explained 14:41 Imperial vs Metric Scaling 16:08 Making an Octagonal Plug for a Hollow Mast 17:38 Planing to the Lines by Hand 18:50 A Simple Tape Trick for Divisions 20:19 Beyond Boatbuilding — Banjos & Walking Sticks 21:14 Why This Method Works So Well #woodenboat #boatbuilding #sparbuilding #woodworking #handtools #traditionalcraft #geometry #DIYwoodworking #NomadBoatBuilding #MarkReuten

