Welcome aboard to the our video site for sailors. We are being constantly blasted by scammers and pirates, so registration is invite only
contact@sailorsahoy.com with "Invite". No spam, no newsletters. Just a free account
מִכְנָסַיִים קְצָרִים לִיצוֹר

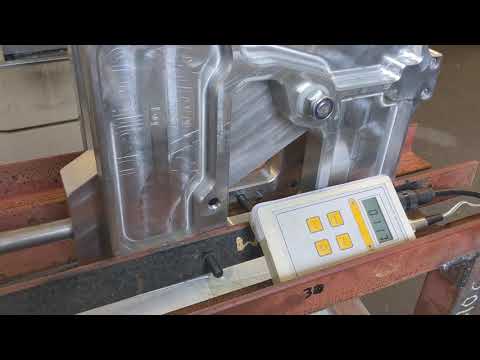
Screwhead teak plugs in 23 seconds!! Having just replaced around 1000 teak screw head plugs…this was the process.. Unscrew every exposed screw: I used a battery drill driver. Drill the hole deeper: I used a 10mm forstner bit as it fitted the existing holes perfectly and did a tidy job. This is subject to having enough teak left to drill deeper. Fortunately Najad were generous with their teak! Try not to drill as far as the fibreglass. Add sealant and replace the screws: I’ve seen videos where they say the screws were just for construction and you can leave them out. That is probably correct but I’m going for better safe than sorry. If the teak was thinner with no room to drill deeper and replace the screws I’d leave them out as a last chance of getting a few more years out of a worn deck. Sealant to stop any water getting into the deck core. I used a hand screwdriver rather than power to replace them as power was tending to rip out the self tapping screws from the fibreglass. Put glue on the plug: I used a polyurethane foaming wood glue. Epoxy would be very strong but mixing all the batches a big pain if you have lots to do. Try to get more glue on the edges than the base of the plug as I had a couple of plugs pushed out as the glue foamed up. Tap in the plug: I used a standard claw hammer as it’s all I had but I daresay a wooden mallet is recommended but the top of the plug is waste material anyway so it matters not. Cut off the excess: I used a Fein multi tool oscillating saw. Be careful with your angle as you don’t want to gouge the surrounding deck. It took me a few goes to master the technique but was pretty quick when I did. I said the top of the plugs were waste but if you found yourself short a lot of them had enough material left to do more holes. Sand flat: I used a random orbit sander with a worn 80 grit pad. I now have fresh patches all over the deck so, once I’ve completed a couple of caulking touch ups, I’ll give the whole deck a very light sanding. You could just leave the newly sanded plug patches to grey down to match the deck if you preferred. And that’s it…repeat many times! Feel free to ask any questions 😊⛵️ #boatlife #liveaboardsailboat #boatmaintenance #najad #boatrepairs

0
0
0
696
Allen Brothers in the UK and the Farr X2 team have been working very hard on the design of a new Rudder Cassette system exclusively for the Farr X2. Stern hung rudders were always in the design brief for two reasons, the main reason based on experience from the Mini Transat 6.5 Series class. Where Bret Perry spent 6 years in the fleet and it was a rule in the series (production) class that kick up rudders were not legal. But the hull design meant twin rudders were the only real option and in the case of an impact the rudder, gudgeons or transom would take the load and could be damaged. With under boat twin rudders in an impact can be a lot worse, leading to severe hull damage, which can lead to potential life threatening situations. So, the team put their thinking caps on to design an impact kick up system for stern hung rudders. The design team went to work and it is now a reality. A share pin designed to break at 100 kg will allow the rudder to kick upon impact. A spare pin will allow you to re set and continue on your way. " Its a safety thing" says Bret Perry. " Hitting an object anytime can be dangerous so being able to minimize the damage to the boat and stay safe as well is critical when your offshore." "With more and more objects in the water the Farr X2 impact fuse rudder cassette system provides that little bit extra peace of mind while out there performing at your best" Perry added.

0
0
0
1,188

0
0
0
0
9

PRESTIGE 500 is the epitome of balance and power. This combination makes the yacht well-recognized and loved by both yacht lovers and experts. The model has won numerous awards, which made it the most awarded 50-footer in the world. Among those: - Nautical Design Awards as the best motor yacht; - World Yachts Trophies for the best interior design; - Motor Boat Of The Year Award, among up to 55 feet yachts; - Robb Repor Magazine announced it “Best of the Best” in 2011. Living Zones. PRESTIGE 500 Interior & Exterior PRESTIGE 500 has a smart-planned location of the living space. Large fully-equipped galley is located on the main deck and serves its internal and external zones. Huge flybridge and sunbathing area provide enough space for the relax time on board. Swimming platform with the swim ladder invites you to spend a wonderful time in the sea waves. The model offers three cabin layout. Master cabin with a separate entrance extends at the full beam. It is visually enhanced by two large in-hull windows. PRESTIGE 500 interior is crafted by The Garroni Design. Technical Specifications PRESTIGE 500 review wouldn’t be full without mentioning its technical abilities. The yacht is empowered with twin Volvo Penta IPS-pod drives and joystick control. PRESTIGE 500 specs ensure its exceptionally high maneuverability. Take a look at PRESTIGE 500 Flybridge and you will never think of any other yacht: http://prestigeyachts.nl/yachts/prestige-500/

0
0
0
192

0

0
0
0
44,757

ABC TV News bulletin on Wyndham Harbour Melbourne to Hobart Yacht Race finish 30 December, 2016

0
0
0
383
