

Последние видео

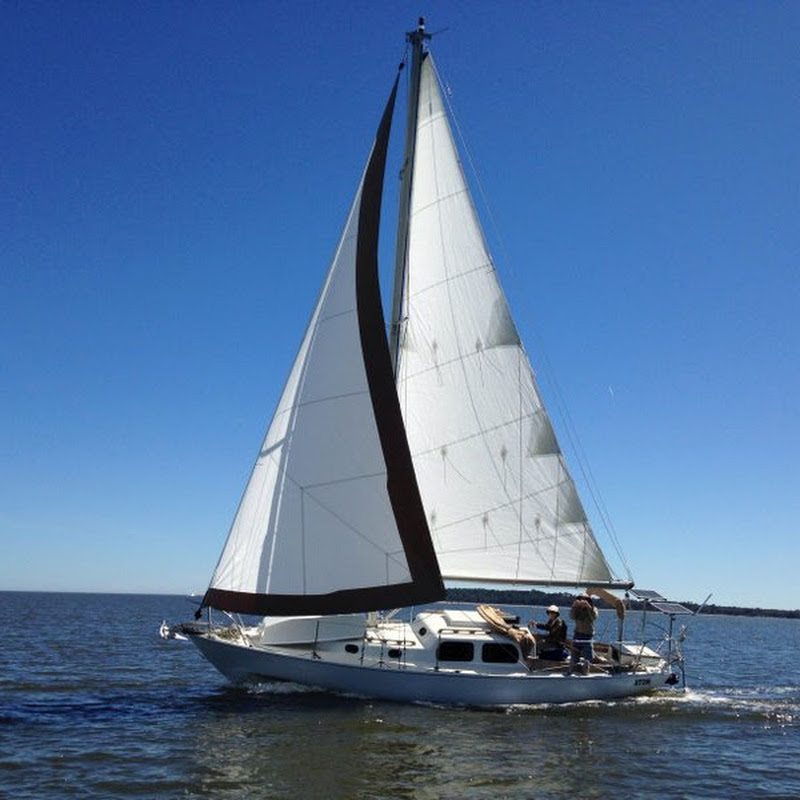
After 45 years together and two circumnavigations, I’m sharing an updated tour of Atom, my modified Voyager Edition Pearson Triton 28. I’ve posted earlier tours some years ago but this one provides more info on design choices that were made and includes recent upgrades. Now that I’ve crossed my last ocean, Atom is still eager to carry on and in the finest shape of her life. I’m in no rush to part with her, but if the right person comes along who appreciates her legacy and wants to keep using this boat for what she was designed to do, I’m ready to pass the torch. Thanks to everyone who has read the books, watched the videos, and shared their own journeys with me over the years. The videos will continue, so stay tuned. Price: $35,000 Location: Brunswick, GA Trailer (2021) available for $5,000 Registration: US Coast Guard Documented vessel. Specifications: LOA: 28’6″ LWL: 21′ Beam: 8’3″ Draft: 4’3″ Displ: Approx. 8,000 lbs. empty. Ballast: 3,019 lbs internal lead Sail Area: 371 sq. ft. Rig: Masthead staysail sloop Keel: technically fin-keeled but commonly referred to as full with cutaway forefoot. Keel-hung rudder. Integral water tanks – Forward: 43 gal. Aft: 22 gal. Engine: 2020 Tohatsu Sailpro 6-hp (used approx. 15 hours) inside a custom-fitted tilt-up outboard well within the lazarette. The stepped cabin house has about 6′ headroom in main salon. For inquiries from those looking to purchase this boat, you can find more inventory details and contact info, as well as my books detailing Atom’s voyages and articles on pocket cruiser modifications at: Inventory List: https://atomvoyages.com/about-atom/ Email: https://atomvoyages.com/contact/ Time stamps: 0:00 - Introduction and history 1:43 - Hull and Trailer 4:13 - Windlass, Dinghy, Sails, Mast Raising 9:02 -Hatches and Cockpit Lockers 11:18 - Dodger, Bimini & Solar 12:47 - Outboard Motor Well 14:56 – Galley, Sliding Double Bunk, Electrical 22:19 - Head & V-berth, Chain Locker, Collision Bulkheads, Water Tanks, Rain Water Collection 27:50 - Closing Thoughts

Most sailboat gear reviews are done by people who just purchased an item or received sponsored equipment. That won’t tell you how the equipment will function in the real world. Here, after this Cape Dory 36 has completed a singlehanded Atlantic circuit, we go through all the equipment we installed to prepare for that voyage and give an unbiased review of what worked, what broke, and what we, or you, might do differently next time. Watch More: If you missed the previous Part One, where Mark recounts the highlights, his personal reflections on the trip, and the intense preparation that went into making the voyage possible, you can find it here: https://www.youtube.com/watch?v=dRaNHkTnLTs&t=1664s For more videos on preparing this boat for his voyage and the individual passages along the way, check out our complete Cape Dory 36 Refit Playlist on this channel: https://www.youtube.com/watch?v=UzLhKzKYoS4&list=PLgXIyWxIta8c0hP2bkFirrvXAq5vkMkp3 Marks blog about his journey from office worker to full-time sailor is at: https://tanken.gallery/ Produced by Atom Voyages Website: https://atomvoyages.com Time stamps 00:00 Introduction 02:02 Ground Tackle & Windlass 03:48 Sails & Chafe 09:00 Whisker Pole 10:37 Mast Ladder 11:05 Takacat Dinghy & Spirit 1.0 Plus Outboard Motor 12:58 Epropulsion Navy 6.0 Electric Outboard 15:15 Harken MKIV Unit 1 Furler 16:55 Self-Steering 18:36 Stove 19:19 Plumbing & Stuffing Box 20:31 Garmin Inreach & Electrical 23:55 Conclusion
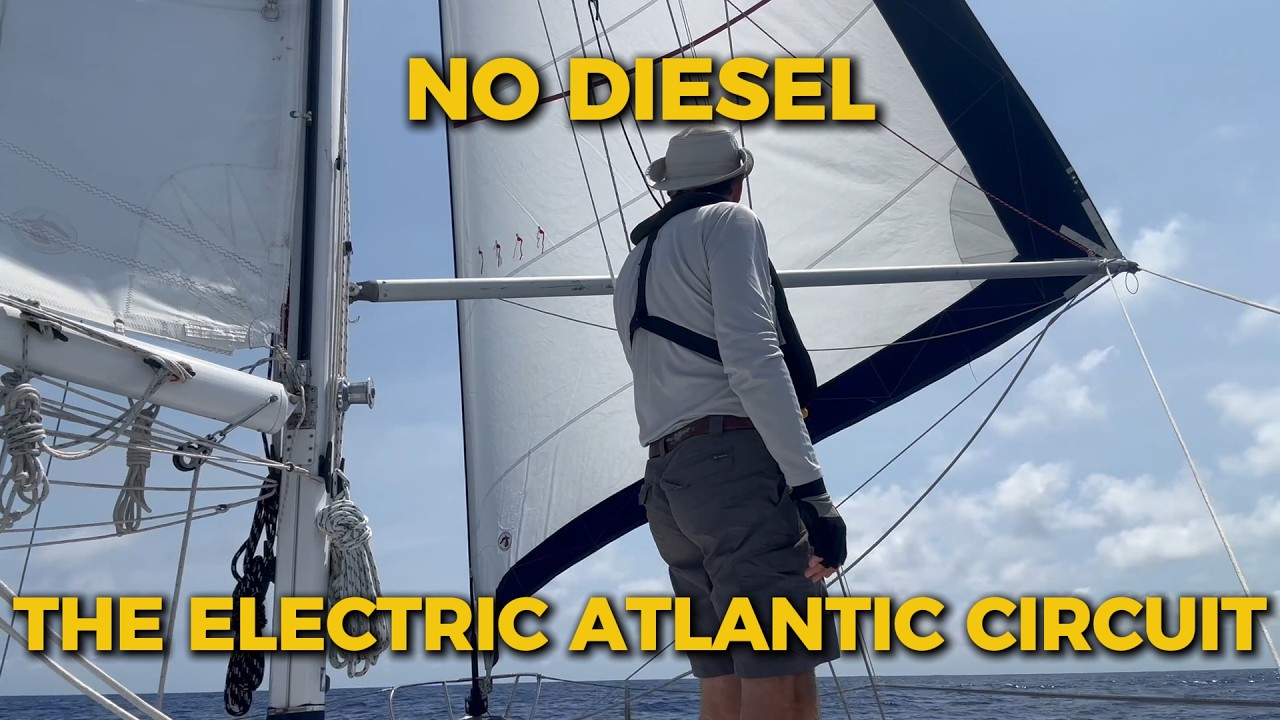
In this video Mark completes his solo one-year Atlantic circuit on his Cape Dory 36, Swan. Adding to the challenge, Mark has no diesel engine, only a small 6kw electric outboard motor in a custom lazarette well used mainly to enter and depart ports. In this interview Mark recounts the highlights, his personal reflections on the trip, and the intense preparation that went into making the voyage possible. Coming Up Next: The 10,000 mile gear review In Part 2, we’ll dive into the technical side to see exactly which gear we chose for this boat and how it held up through two Atlantic crossings. Watch More: For more videos on preparing this boat for his voyage and the individual passages along the way, check out our complete Cape Dory 36 Refit Playlist on this channel: https://www.youtube.com/watch?v=UzLhKzKYoS4&list=PLgXIyWxIta8c0hP2bkFirrvXAq5vkMkp3 Marks blog about his journey from office worker to full-time sailor is at: https://tanken.gallery/ Produced by Atom Voyages Website: https://atomvoyages.com Time stamps 0:00 Introduction 1:10 Sail Handling 7:28 Ground tackle 12:13 Cockpit Modifications 14:48 Electric outboard motor 18:37 Self-steering 19:07 Storm drogue 19:33 Navigation 22:13 Interior tour 28:27 Voyage preparations 33:03 Passage Georgia to Bermuda 36:35 Passage Bermuda to Azores 39:58 Passage Azores to Morocco 43:00 Passage Morocco to Cape Verde 45:25 Passage Cape Verde to Dominica Is. 48:00 Passage Dominica to St Simons Island, GA 54:18 Conclusion

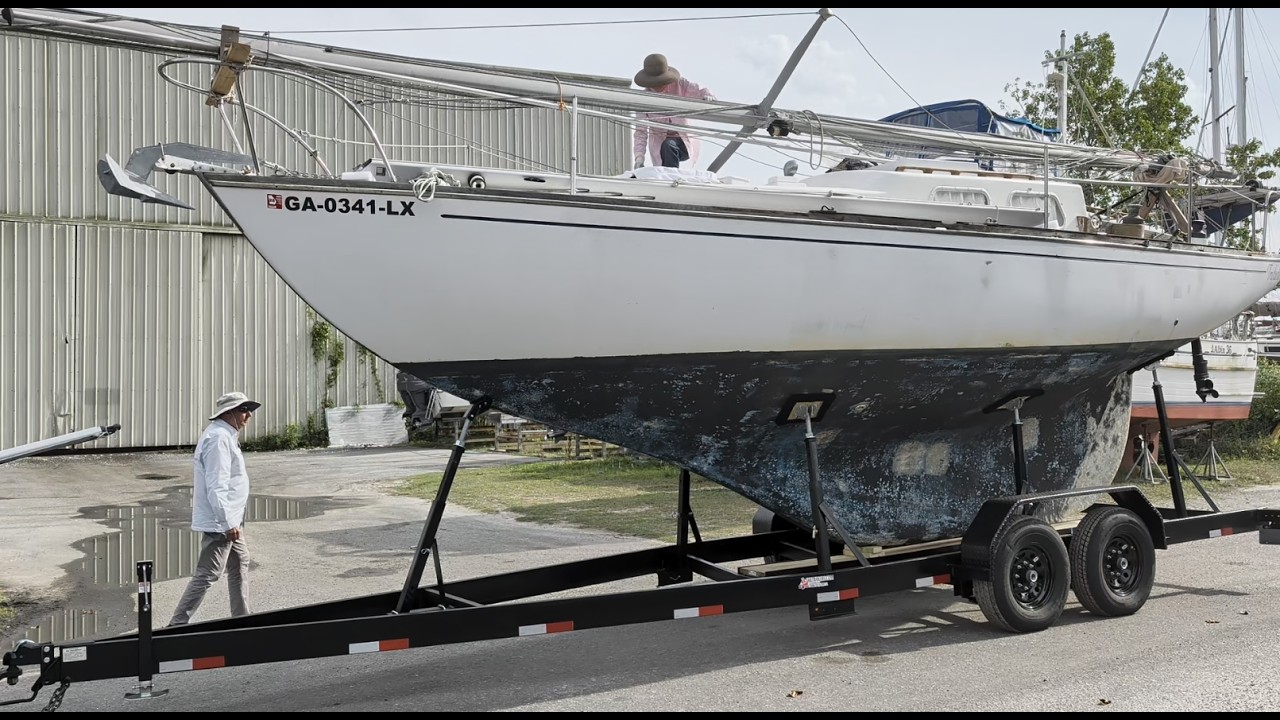
A practical overview of preparing and hauling a fixed-keel sailboat on a custom telescoping-riser, tandem axle trailer. In the previous Part 1 episode we looked at the trailer design elements for ordering or building a versatile keelboat trailer for various sized boats. In this follow-up video we look at the operational side of loading and hauling mid-size sailboats on the road. This includes loading the boat, unstepping the mast and securing on deck crutches, handling road logistics for short or long trips, and blocking up the trailer for storage. We also see what can happen when a travel lift breaks down and drops the boat. If you missed the boat trailer design overview, watch Part 1 https://www.youtube.com/watch?v=C0RJOwusgTA&t=9s The trailer specs below will assist you in ordering a similar trailer with correct specifications or can be a starting guide for building your own trailer: 1. Lift-off type, tandem 7,000lb drop axles, both with electric brakes. 2. 14,000 GVWR construction, 7" channel, 2 5/16" ball. (You might notice the tag on the trailer states 12,500 lbs. We derated it so as not exceed the weight I’ll be using with my Class 5 ball-type hitch, and to stay within private-use registration tiers. Consider it a built-in safety factor.) 3. 7,000lb fixed tongue jack welded to frame (not the lighter swivel type). 4. Extendable nesting hull support channels and screwpads on threaded rods with 6 side supports placed outboard as far as possible (see sketch): Single bow center riser 26" long overall, 74 degrees. V screwpad at bow on sliding base held by U-bolts with extending riser channel. Two forward side supports risers 28" overall, 82 degrees. Two center side risers 28" overall, 90 degrees. Two aft side support risers 34" overall, 82 degrees. 5. Main 7” U-channel frames to continue forward within 8” of tongue for best support. 6. ST235/80R16 Range E tires or equivalent with spare tire. 7. Primer and black paint. 8. All galvanized fasteners. 9. LED lights. 10. Treated wood for screw pads and bed. Let me know in the comments if you have any questions. You can also contact me by email through AtomVoyages.com.
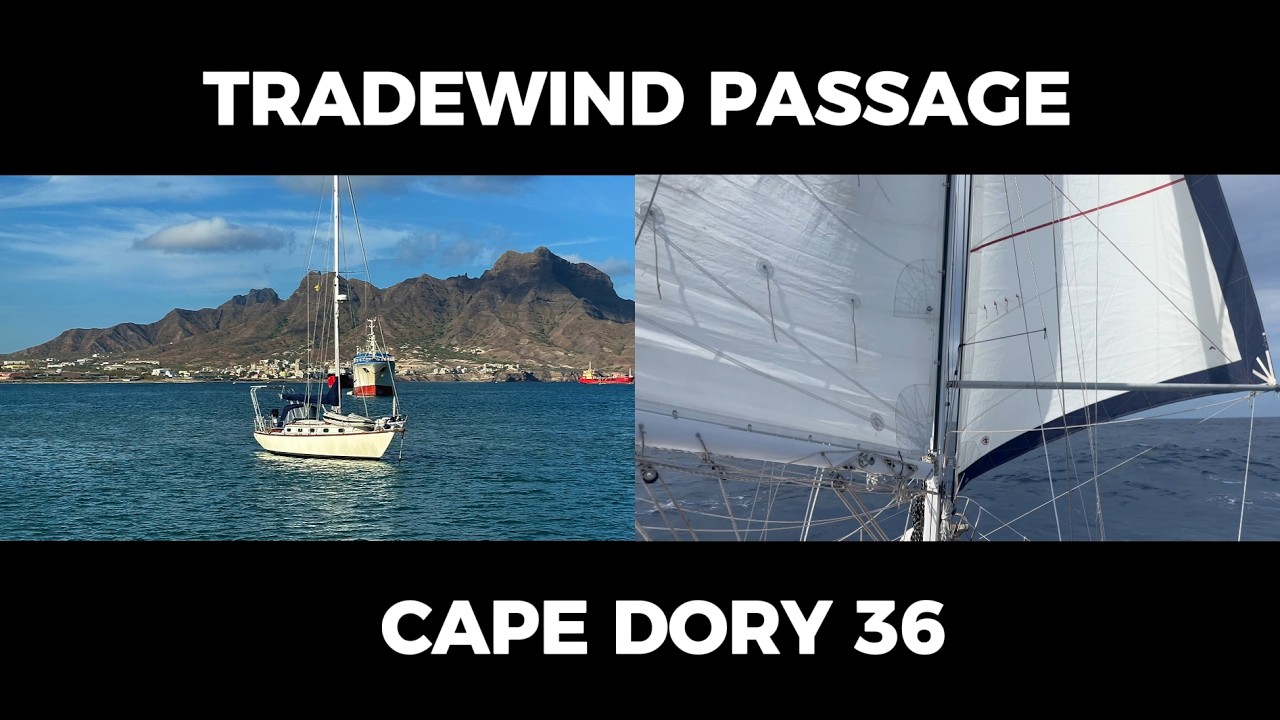
In the previous episode, Mark sailed his Cape Dory 36, Swan, solo from Morocco down to Mindelo in Cape Verde. Now on the return leg of his Atlantic circuit he faces the big one - the 2,200-mile trade-wind passage across the Atlantic to Dominica Island in the West Indies. There is no diesel engine. Only a small 6kw electric outboard motor in a custom lazarette well used mainly to enter and depart port. For more videos on preparing his boat for this voyage, check out the Cape Dory 36 Refit Playlist on this channel. https://www.youtube.com/watch?v=UzLhKzKYoS4&list=PLgXIyWxIta8c0hP2bkFirrvXAq5vkMkp3 Marks blog about his journey from office worker to full-time sailor is at: https://tanken.gallery/ AtomVoyages.com
This is a design overview and specifications breakdown of a custom, versatile tandem-axle trailer for transporting your own fixed-keel sailboat in the 26 to 32-foot range (such as the Pearson Triton, Alberg 30, or Cape Dory). Rather than a fabrication or welding tutorial, this video focuses on the structural dimensions, design logic, and the telescoping riser support system that allows a single trailer to safely match and adjust to different hull contours. The info in this video will assist you in ordering a similar trailer with correct specifications or can be a starting guide for building your own trailer. Below are the general specs for the trailer: 1. Lift-off type, tandem 7,000lb drop axles, both with electric brakes. 2. 14,000 GVWR construction, 7" channel, 2 5/16" ball. (You might notice the tag on the trailer states 12,500 lbs. We derated it so as not exceed the weight I’ll be using with my Class 5 ball-type hitch, and to stay within private-use registration tiers. Consider it a built-in safety factor.) 3. 7,000lb fixed tongue jack welded to frame (not the lighter swivel type). 4. Extendable nesting hull support channels and screwpads on threaded rods with 6 side supports placed outboard as far as possible (see sketch): Single bow center riser 26" long overall, 74 degrees. V screwpad at bow on sliding base held by U-bolts with extending riser channel. Two forward side supports risers 28" overall, 82 degrees. Two center side risers 28" overall, 90 degrees. Two aft side support risers 34" overall, 82 degrees. 5. Main 7” U-channel frames to continue forward within 8” of tongue for best support. 6. ST235/80R16 Range E tires or equivalent with spare tire. 7. Primer and black paint. 8. All galvanized fasteners. 9. LED lights. 10. Treated wood for screw pads and bed. I’ve included a sketch in the video to give you a clear sense of the dimensions and layout. Subscribe to get notified when the next video comes out: “Towing a Fixed Keel Sailboat: Trailer Setup and Transport Tips,” where I cover setting up the trailer for different boats and some tips on trailering short or long distance. Let me know in the comments if you have any questions. If you want a PDF of the dimensioned sketch and notes, contact me by email through AtomVoyages.com.

In this Cape Dory Refit Part 7, we modify the galley to better suit a minimalist, off-grid setup. In a previous video we covered the conversion from bulky propane stove and oven to Origo alcohol stove. Now we’re removing the original built-in ice box and drawers to create a custom locker to house a removable portable fridge/freezer and a dedicated 12V battery supply, providing better efficiency and more versatile storage. A portable fridge/freezer keeps it compact, affordable, and easily replaceable rather than trying to maintain a built-in unit. Check this channel’s Cape Dory 30 Playlist for other refit projects on this boat: https://www.youtube.com/playlist?list=PLgXIyWxIta8eHZ9PHa8Fk-KmLvs80pGr4 For more articles focused on refitting small voyaging sailboats, check out https://atomvoyages.com.

Here in Part 6 of the Cape Dory 30 refit series I show how to reduce unwanted thru-hulls by removing them and fiberglassing and fairing over the holes using epoxy resin. Check this channel’s Cape Dory 30 Playlist for other refit projects on this boat. For more articles focused on refitting small voyaging sailboats, check out AtomVoyages.com. 00:00 Introduction 01:11 Remove old thru-hulls 01:47 Grinding a scarf 03:51 Applying fiberglass 12:10 Applying fairing compound 13:16 Finishing

Cape Dory sailboats are often prone to leaks at the hull-to-deck joint, which can occur both at the teak toe rail fasteners and where the glued joint edge has degraded. Sealing this area from above is a huge task; it requires either fiberglassing over the entire toe rail and then repainting the whole boat, or removing the rail entirely to glass the joint and reinstalling a rail - which still leaves you with potential leak points at the new fastener holes that could leak. Instead, to save some labor and ensure a seal, here in part 5 of this Cape Dory 30 Refit series we make this deck joint watertight by fiberglassing it from below deck. This internal approach creates a permanent bond without the need for a total exterior refit. By choosing this method, we still have the option of keeping the original toe rail in place and adding some height to the worn down rail by laminating another piece of wood to the top and finishing it with a durable accent paint rather than high-maintenance varnish. If you have other techniques for tackling these joints or any questions about the process, let me know in the comments.

Here in Solo Sailor Atlantic Circuit Part 4, Mark and his modified Cape Dory 36 Swan continue their circle cruise of the Atlantic, sailing in November 2025 from Agadir, Morocco to Mindelo, Cape Verde. The next leg will be his return trans-Atlantic passage to the West Indies. A unique aspect of his voyage is that for auxiliary propulsion he is using a tilt-up 6kw electric outboard in a custom built well in the lazarette locker. Since it has very limited range he mainly uses it only to depart and enter harbor. On this passage he had persistent trade winds behind him and only a few hours of light winds so he did not need to motor at all once he cleared the harbor. For more videos on preparing his boat for this voyage, check out the Cape Dory 36 Refit Playlist on this channel. Marks blog about his journey from office worker in New York City to full-time sailor is at: https://tanken.gallery/ AtomVoyages.com

DIY Retractable Solar Panels on Speed Rail Arch - Cape Dory 30 Refit Part 4. To maximize solar power in the restricted space on this 30-foot Cape Dory cutter (with electric propulsion), we designed this no-weld/no-bend method for a DIY retractable solar array arch built from Speed Rail fittings, aluminum pipe, and heavy-duty stainless-steel drawer slides. The two extendable panels stow flush under the two fixed upper panels while maneuvering in a marina or for low windage when sailing offshore in heavy weather. They slide out on tracks to deploy when needed at anchor or in moderate conditions offshore. The arch is done but the wiring will be covered in a future video. Subscribe to follow the refit. For more sailboat projects, visit AtomVoyages.com Parts List: Eight pieces 6463-T66 schedule 40 polished anodized 1.25" pipe sold in two pieces 23' stock length. (we used about 36' total) $270 total. It's easiest to cut the pipe and angle on a chop saw but you can also cut it with an angle grinder or hack saw. We purchased two pieces 1.25" polished 6463 grade aluminum schedule 40 pipe in standard 23' lengths from our local wholesale supplier. At $135 each it was cheaper than ordering 8 pieces of cut lengths online. Bright polished anodized aluminum pipe is twice as expensive as 6061 non-anodized and if you don't have a local wholesaler then anodized pipe cost could be prohibitive, which is why most DIY builds choose non-anodized. In that case be prepared to let it weather into that dull oxidized appearance. Note that pipe (like this Schedule 40) is measured by its Nominal Inside Diameter (ID), while stainless steel tubing is measured by its Outside Diameter (OD). This 1.25-inch pipe has an OD of 1.66 inches. If you’re building a larger arch, you'll want to use 1.5-inch pipe (1.9" OD). We used Schedule 40 because it’s plenty strong, lighter, and less pricey than heavy-walled Schedule 80. Two pieces 6061-T6 3/16" x 2" x 62" angle bar (NOT anodized) sold in one piece 25' stock length $87. Anodized angle bar is hard to source and in this build it is not in a highly visible area so doesn't matter if it becomes oxidized on the surface. A stock 25' piece of angle bar is double what we needed but at $87 it was cheaper than buying two shorter pieces online. And we can use some of the leftover on other projects. Speed-rail fittings: 1. Four pieces 1.25" Tee-E $16.48 each https://www.buyrailings.com/shop/variant/07060-5e-tee-e-aluminum-magnesium-1-1-4-ips-12794 2. Four pieces 1.25" elbows $21.16 each https://www.buyrailings.com/shop/variant/07020-3-elbow-aluminum-magnesium-1-1-4-ips-12035 3. Four pieces 1.25" Rectangular Base Flange $22.34 each https://www.buyrailings.com/shop/variant/27170-47-rectangular-base-flange-aluminum-magnesium-1-1-4-ips-12476 4. Two sets stainless steel drawer slides, 27 9/16" closed length. McMaster-Carr Model: 13875A21 $80 each. Solar panels: Two 200 watt and two 100 watt N-type BougeRV 200w bi-facial panels. Because these are N-type bi-facial, shade tolerant, and wired in parallel, they will cope with partial shading better than standard single-sided P-type panels. Clamps and fasteners: We used two Garhauer Dinghy Davit Stern Rail Clamps 1″ to 1.25″ DD-SRC 1-1.25 $75 each. These tube clamps are not a perfect fit to 1.25" pipe but are still useable. You can special order these clamps for 1.5" tube for a better fit (model DD-SRC 1-1.5) or look elsewhere for different style cheaper clamps. Fasteners: 16 sets 3/8" stainless hex bolts sized for deck thickness and backing plates, nuts and washers for bases 12 pieces 1/4" x 3/4" flat head stainless machine screws for angles to pipes 20 pieces #10 x 1/2" flat head stainless machine screws for Tracks to angle bars 20 pieces #8 x 3/4" flat head stainless machine screws, nuts and washers, for tracks to solar panels 24 pieces 3/8-16 x 1/2" Allen head stainless cone point set screws to replace Speed Rail zinc-plated steel set screws AtomVoyages.com #DIYBoatProject #SailboatSolar #Speedrail #AtomVoyages

We continue the Cape Dory 30 cutter refit, adding modifications for living aboard and offshore voyaging. Here we remove the two original 30 gallon plastic water tanks which were leaking and were surrounded by a space wasting fiberglass hull liner and constructed two larger integral water tanks built into the hull. Also check the owners youtube channel Aboard the Flying Spur: https://www.youtube.com/@flyingspur/videos Materials used for one tank of approx. 40 gal. (151 L). Inside dimensions 47" L x 26" W (starboard side 24" W) x 13" H on inboard side tapering along hull to 3" H on outside: 1. 2.5 sheets of Diviycell H-80 5 lb density plain sheet, 3/8" thick x 24" x 48". $59 ea. fiberglasssupplydepot.com 2. Beckson 6" deck plate. 3. About 2.5 gal of epoxy resin needed of either a 2.5 gal kit, fast 4-1 hardener EPOX-635414 $162. Or 4 gal kit slow 3-1 hardener EPOX-6353156 $245. uscomposites.com 4. 5 qt (8 oz) Aerosil/Cabosil epoxy thickener FL-AER050 $11 uscomposites.com 5. One Beckson 6.5" Screw-Out Deck Plate DP60-W $26 Defender.com 6. Fiberglass - Use either 1208 biaxial which is composed of 12 oz per sq. yd. cloth stitched to a layer of 3/4oz per sq. ft. chopped mat for total weight of 18.75 oz per sq. yd. Or use a combination of 1208 and the lighter 10 oz E-glass regular fiberglass cloth tape in 4" and 6" width. You want the divinycell panels to be stiff like plywood when finished so when using 1208, one layer on each side is sufficient. When using 10 oz plain cloth use two layers each side. Amount needed will vary depending of type of cloth chosen. fiberglasssupplydepot.com 7. One 1/2" straight plastic thru-hull for tank outlet 8. One 3/4" 90 degree plastic thru-hull for vent 9. 1/2" and 3/4" SHIELDS RUBBER Series 162 Polyester Reinforced Clear PVC Tubing and clamps 10. Sika 291 sealant 11. One gal kit white Total Protect epoxy primer barrier coat $135 totalboat.com 12. One gal kit of Devoe Bar-Rust 233H $123 https://specialtycoatingsinc.com/products/bar-rust-233-off-white Or PPG Aquatapoxy A-61 (or A-6) . You only need about two qts for two coats but you can use leftover to coat bilge or lockers. Labor for each tank approx. 36 hours.

We continue refitting a Cape Dory 30 cutter, adding modifications for living aboard and offshore voyaging. Here we begin interior modifications including removing the fiberglass hull liner to rebuild the v-berth and chain locker with watertight collision bulkheads, redesign the clothes locker, head and galley, and address hull/deck joint leaks. Also check the owners youtube channel Aboard the Flying Spur: https://www.youtube.com/@flyingspur/videos
Mark continues his travels on his modified Cape Dory 36 Swan on the third leg of his Atlantic circle cruise, sailing from Horta, Azores in June 2025 to Praia da Vitoria on the island of Terceira. On August 25 he departed Azores for a 5 day passage to Porto Santo (Madeira). After a brief layover he made a passage to Agadir, Morocco in just under 4 days, completing his first Atlantic crossing. The next leg will be his passage from Morocco to Cape Verde. A unique aspect of this voyage is that for auxiliary propulsion he is using a tilt-up 6kw electric outboard in a custom built well in the lazarette locker. Since it has very limited range he mainly uses it only to depart and enter harbor. For more videos on preparing his boat for this voyage, check out the Cape Dory 36 Refit Playlist on this channel. Marks blog about his journey from office worker in New York City to full-time sailor is at: https://tanken.gallery/

Mark departs Bermuda on May 30, 2025 on his modified Cape Dory 36 Swan on the second leg of his planned Atlantic circle cruise. For auxiliary propulsion he is using a tilt-up 6kw electric outboard in a custom built well in the lazarette locker. Since it has very limited range he rarely uses it on passage - on this leg only to depart and enter harbor. The next leg will be his passage from Azores to Morocco. For more videos on preparing his boat for this voyage, check out the Cape Dory 36 Refit Playlist on this channel. Marks blog about his journey from office worker to full-time sailor is at: https://tanken.gallery/

Mark departs St Simons Island, Georgia in May 2025 for Bermuda on his modified Cape Dory 36 on leg one of his planned Atlantic circle cruise. For more videos on preparing his boat for this voyage, check out the Cape Dory 36 Refit Playlist on this channel. Marks blog about his journey from office worker to full-time sailor is at: https://tanken.gallery/

Follow as we begin refitting a Cape Dory 30 cutter and adding modifications for offshore voyaging. Also check the owners youtube channel Aboard the Flying Spur: https://www.youtube.com/@flyingspur/videos AtomVoyages.com

The Sandpiper 32 is a fiberglass round-bilged Sharpie, of which 17 were reportedly built by Marine Innovators in Florida. Designed to carry 1800 lbs. of iron ballast sealed in 200 lbs. of polyester bonding filler in a molded fiberglass grounding shoe which is integral to the hull and fiberglassed over inside the hull. The remaining 500 lbs. of recommended ballast (gear) is carried inside for trimming. Video by AtomVoyages.com LENGTH OVERALL 32' WATERLINE LENGTH 28'4" BEAM 8' HEADROOM 5`, AFT CABIN POP-TOP 6'+ FREE STANDING MASTS (for CAT SCHOONER) 32' and 26' ENGINE - Inboard or outboard motor DISPLACEMENT 7400 lbs. SAIL AREA (for CAT SCHOONER) 363 sq. ft. DRAFT - boards up 19" (we measured it as 24") DRAFT - boards down 4'6" Inboard electric propulsion system: https://www.annapolishybridmarine.com/thoosa-inboard-systems.php Below is designer and builder Walt Scott’s description of the Sandpiper: SANDPIPER has evolved from over 45 years of designing and sailing shoal draft boats. In addition I have spent many hours over the writings of Chapelle, L. Frances Herreshoff, Beebe, Colvin and other devotees of the sharpie. Finally, Munroe's. "THE COMMODORE'S STORY", and Gilpin's, "THE GOOD LITTLE SHIP", convinced me that what I needed for my own cruising boat here in the shoal waters of the west coast of Florida was a scaled down version of the Commodore's PRESTO. PRESTO was the first of a long line of round-bilged sharpies designed by Commodore Munroe for use in general transportation and salvage operations in the shallows of the Florida Keys from the 1880's into the twentieth century. They were derived from the original flat bottomed sharpies used for oyster tonging off New Haven in Long Island Sound. The long narrow flat bottom work boat existed in various forms along the entire Atlantic coast and around into the Gulf. They were easy to move with oars before the gasoline engine existed; their rigs used simple unstayed pole masts; they could carry a heavy load with little draft; they could be beached without damage; and they were inexpensive to build. A SANDPIPER hull is very similar in lines to PRESTO except that it displaces 7400 lbs. on a 28.3 ft. waterline instead of 17,000 lbs. on a 35.5 ft. waterline for PRESTO. This makes for an easier boat to move around on land and take home for winter storage. PRESTO carried 4 ½ tons of inside ballast. SANDPIPER carries 1800 lbs. of ballast sealed in 200 lbs. of polyester bonding filler in a molded fiberglass grounding shoe which is integral to the hull and fiberglassed over inside the hull. The remaining 500 lbs. of ballast (gear) is carried inside for trimming. The low ballast center of gravity combined with the light weight rig and the low cabin profile result in a positive righting moment even in a 90 degree knockdown. PRESTO carried a large heavy centerboard which took up a lot of space in the cabin. SANDPIPER instead has two bilgeboards which swing into trunks which are integrally molded into the hull under the berths. The use of bilgeboards not only eliminates the internal space problem but it reduces the vulnerability of the slot to damage or jamming from grounding. Sharpies, being long and narrow, favor a divided rig to get sufficient sail area along with a low center of effort and a low rig center of gravity. The SANDPIPER rig is a cat schooner rig with unstayed masts of aluminum. [This boat is a schooner but not unstayed cat rig]. One of the disadvantages of the sharpie has always been lack of headroom. With the relatively narrow and shallow hull it is necessary to keep the cabin weight low to maintain good stability. With the help of the arced bottom I have been able to attain a minimum of 5 ft. headroom in SANDPIPER. For additional headroom at anchor, a tight fitting pop-top spans the main cabin area, providing 6 ft. of headroom or even more if required. A seal around the sides can be fabricated of vinyl coated cloth with snaps and Velcro bug proofing.

After a year long refit the Cape Dory 36 Swan is complete and sets sail for a three month cruise to Bahamas and then back to Brunswick, GA briefly. In July they head north offshore some 900 miles to New England with one stop at Cape Lookout Bight, NC. Video by James Baldwin and Mark Meredith For details of Swan's refit modifications see the first five videos on our Cape Dory 36 playlist. For more info about Mark's journey, check his blog at: https://tanken.gallery/ Music: Sail Away by David Gray, cover by Chris Kläfford

We test two portable gas generators - The Honda EU2200i, which has an 1,800 watt continuous run rating, on a Cape Dory 27 sailboat to charge the 48v lithium battery bank that supplies the 3kw electric motor - and the cheaper Powersmart 2500, which has a 1900 watt continuous run rating on a Cape Dory 36 with 6kw motor. Honda EU2200i 2200 Watt Portable Inverter Generator https://www.amazon.com/Honda-2200-Watt-Companion-Generator-Co-Minder/dp/B08YJP5HC7/ref=sr_1_1?th=1 Powersmart 2500 watt portable gas generator https://www.amazon.com/dp/B089FDFDH5?th=1 Accessories: Regardless which model generator you select you may want these two accessories. Other than the typical 15A household extension cord one item you will need is a neutral to ground adapter plug that you plug into one of the AC outlets on the front of the generator. This is needed to prevent the generator shutting down due to wrong polarity if you plug the extension cord into your boat or RV shore power inlet rather than running it direct to the appliance you want to power. The other item you might need is a 15A male to 30A female adapter for connecting standard household extension cord from generator to boat's shore power receptacle. Ground to neutral adapter plug needed: https://www.amazon.com/Southwire-Company-LLC-44400-Generator/dp/B07F4R7BDL/ 15A male to 30A female adapter for connecting standard household extension cord from generator to boat's shore power receptacle: https://www.amazon.com/Marinco-ParkPower-Straight-Blade-One-Piece-Twist-Lock/dp/B076F9N6JY/ref=sr_1_33 12 or 14 gauge 120v extension cord. AtomVoyages.com

