


Últimos vídeos

Replaced the intermediate part. Best to unscrew from the backside of the engine. Hose impossible to get off from the exhaust bend (had later to cut it free). Recommend you to cut it directly, so the rest can be left in their positions. If possible slice the old part and hammer it careful inwards. It’s fast and make no damages. Else grind it and then remove the coil with a sharp object. Probably you will have to clear the threads futher. At least I had to do that. A sharp poited object, like an awl, a lot of patience and time. At the end it will be good enough. I made the contact surface flat. Make a test if you can get close to the right angles of the assembly. If it’s totally wrong you have to clear the treads futher. Use then furnance sealant on the male treads and assemble. It must be very tightly assembled and you can tighten harder than you think. The angles must be right. Can’t that be made clear the threads futher and you will get it to work. Use a new gasket when you bolt the exhaust system back to the engine. And a torque wrench, 24 Nm. I recommend that you use Nordlock washers instead of the old spring washers. Had severe problems with bolts getting loose before I changed to Nordlock.

Ett försök att berätta fördelarna med en klassisk båttyp, du får sådant som du inte får med modernare konstruktioner. Långt, smalt och lätt ger härliga egenskaper. Längd ger fart. Bredd och tyngd bromsar. Smalt och lätt gör att små segel räcker. Segel kostar per m2 De väger också per m2, skönt att kunna hissa för hand. Smala ändskepp, v-bottnad och en lång fenköl gör att båten klyver vågorna. Motsatsen är gunghästar, som ska över varenda våg och båtar som stampar i varje våg. S30 klyver vågorna mjukt och fint, en stor fördel när man seglar utomskärs och ska långt. S30 har långt bak sittande frihängande roder, det gör att hon vänder på stället. Man får lägga om rodret och sedan köra omväxland fram och back, så vänder hon på stället. Behövs ingen krånglig och dyr bogpropeller Med rätt skotade segel är S30 så kursstabil att jag kan släppa rodret och fixa något snabbt. Seglar mycket själv och har alla fall på masten (0 problem), men det är sällan som jag behöver använda autopilot. Hissar storen, tar in kjolen på genuan, hämtar upp lunch etc utan att hålla i rodret. Egenskaper i naturhamn är mer kända. En köl som sticker 1,5 meter och sitter 4,5 meter bak passar väldigt bra i naturhamn. I synnerhet som förstäven lutar lagom och är låg. Den som är normalvig kan baklänges stiga ner på en sten i vattenbrynet. Det finns segelalternativ för alla smaker. Många är väldigt nöjda med självslående fock och stor. Andra föredrar rullgenua och stor. En tredje variant är rullgenua + en mindre fock på ett löstagbart inre förstag, då får man bra driv i alla vindar. S30 har två förstagsinfästningar och hade tidigare den mindre focken för den bakre infästningen, så det finns gamla segel kvar på vindar. På undanvind kan man använda kryssegel eller undanvindssegel. S30 har extra stora undanvindssegel för att hon kan bära den större storleken. S30 är en lätt båt, vilket underlättar det mesta. Lätta ankare. Lätta segel Lätt att hantera i hamnar S30 är en stark klass Över 300 båtar Fungerande klassförbund

S30 Skärgårdskryssare i plast med havskapacitet. Speciellt på detta exmplar är ett löstagbart inre förstag för hög smal kryssfock

Be careful so you not flood the engine with cooling water through the exhaust system! If you need to crank the engine a lot this can happens. The easy and safe way is to remove the belt from the water pump. After renovation you have to fill the fuel pipe and maybe have to crank a lot. Follow the manual for the engine, but use the start engine to bleed at the injector. After that tight the nut and hand crank the engine, then you get the sound of the injection as a confirmation that alla air is out of the system. The sound in the video is not the right one, it should be much shorter. It's not on the video, but you should loosen the nut at the injector before you lose at the pump to bleed the delivery valve. I have done all possible errors and here comes the list. - Don't crank the engine until all nuts at the injection pump are tighten. If you crank you let air in. - It's not possible to check the bleeding at the delivery valve, the pipe must be there to not let air in. - The delivery valve (the black nut at the injection pump) must be firmly tighten. Harder than on the video. - You need only to get some fuel out at the delivery valve. A lot and you have probably let air in. - Listen for the small noice after you have tighten the nut at the injector and crank the engine manual (with the de-compression activated) the fuel system is air free. - If the engine is hard to crank manual you have not decompressed it fully - If you have had the small noice and the engine don't start something else is wrong. - It's easy to bleed the air out. The only thing which might be hard is to fill the fuel pipe, but when you have got fuel out at the loosen nut at the injector that is ready. To hand crank to fill the pipe is near to impossible, only small drops of fuel comes at each turn of the engine.
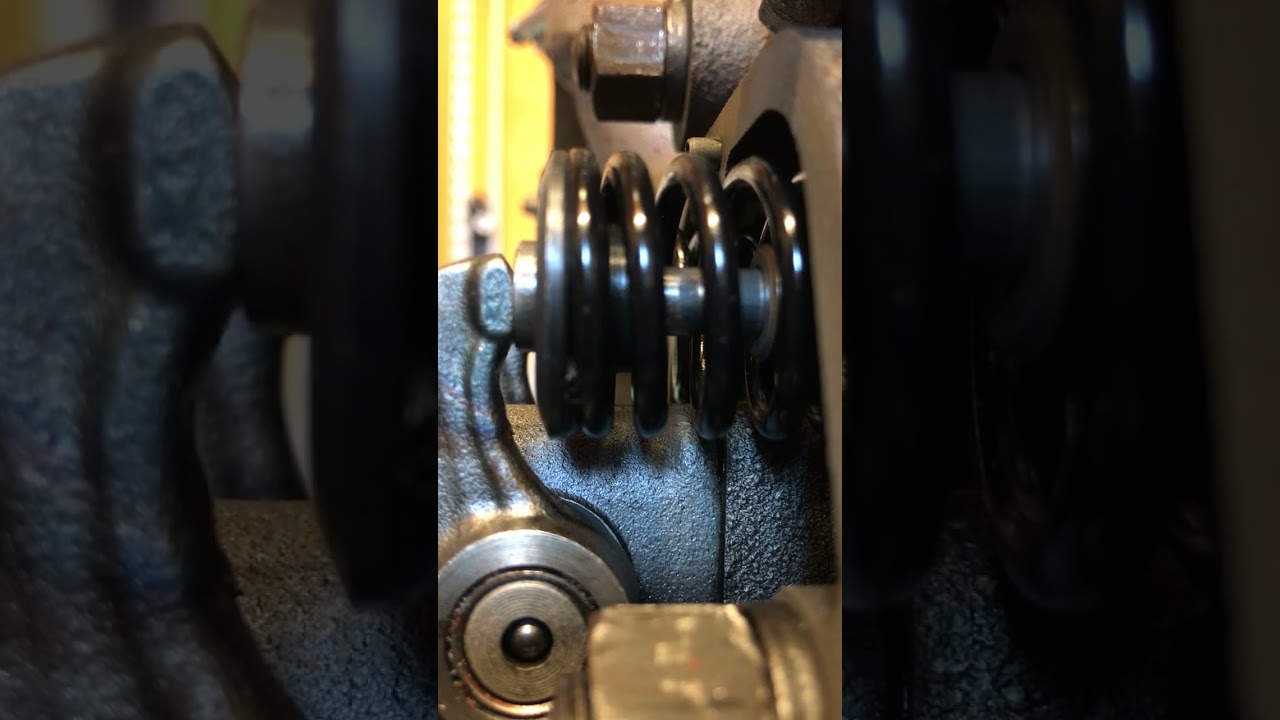
Push rods are incerted, you feel when you get them right. As the valve seats have been grinded the valve rocket arm will meet the valve differently than before, the geometry beteen parts have changed. Adjustments will be needed and it's the closest distance which should be measured

Check with your supplier of head gasket if you should or not should use jointing compound. If you use a Yanmar gasket you should not use compound. I use a Sunity and should use. Hylomar I used. The head nuts shall be tighten in steps diagonally, not to the final value at once. Tightening torque differs between the service manual for YSE8 and YSM8. More than I have used the higher YSM8 value by misstake. Not clear if the higher applies to both or not

S30 är en 12,5 meter lång entyps skärgårdskryssare med havskapacitet. Speciellt på denna är ett löstagbart inre förstag för en hög smal kryssfock Om du inte gillar den här varianten så finns det andra varianter på S30
Yanmar YSE8 Renovation cylinderhead Fitting valves (by professional for 50$) Assembly of new cylinderliner Removing old gaskets Flatten the cylinder head took several hours, the rest was easy and quick. Cleaned very careful before assembly of new liner. Used the mobile phone video to see that all was completly clean

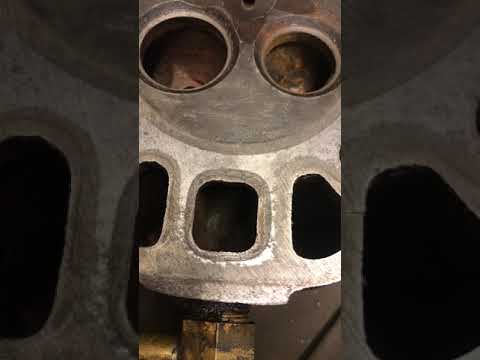
It's easy to disassembly an YSE8 / YSB8 / YSM8. The only difficulty is to remove the liner. I heated up the engine block with a fan. Used a home made line puller as suggested in the service manual. Stuffed the liner full with crushed ice. And held an extension socket om the nut (the one inside the engine) and used a hammer. Then it got loose and the rest was easy

